Friday, December 24, 2010

Fairies in pink


No posts for ages! I haven't been able to upload pictures. After checking the help section I was advised to returned to the old editor and hey presto!
Anyway without further ado - I recently bought a set of Debbi Moore Designs Kerry Jo stamp sets (& the CD). This is one of them - I think she is a fairy, anyway, cute whatever.

Monday, October 4, 2010

First Birthday

Colin's grand-daughter was one year old on 29 September. This is the card I made for her.
It's an 8x8 easel card. The centre is a Wizard label die with a scene from the Crafter's Companion Beatrix Potter CDRom, decoupaged. The letters for her name were stamped, coloured and glazed. The flowers were stuck on with glue gel. The background for the card was stamped with a huge corner stamp from a Sheena Douglass plate. The sentiment was printed from the PC and mounted onto a Wizard label.

The second picture shows the card set as an easel.

Sunday, October 3, 2010

Lets shop!

It's been a long time since I last put anything on the blog. It's been a very hot summer here in Spain, combined with visitors, it hasn't left much time for crafting.

Anyway, I was asked to make a 40th birthday card for a girlie who likes bags and shoes. So, using the Papermania stamp sets of the shop front and shopper with bags, I made this card. I printed the shoes direct to the cardstock and made an easel card. The shop front was stamped onto card abd coloured around the edges with distress inks. I restamped the shopfront and embossed. This makes colouring in easier as it keeps it within the lines. I also stamped just the canopy on striped paper.  This was mounted using DST at the top and glue gel along the bottom edge to make it stand off the shop front.  I used Whispers markers scratched onto a tile and used as watercolours. The lady was stamped, coloured in the same way and cut out and mounted with foam tape. Lots of bags were stamped, coloured and cut out, then mounted with foam tape. The black edges are from a Wizard die called the grand classic 12" lace border. The wording is on the inside and the little card at the front is as requested. Both were cut out using a labels die cut - can't remember what it's called. The picture below is again of the card but with the box I made for it.

Friday, July 23, 2010

Polka Doodles Competition

Polka Doodles are holding a MEGA colouring competition. The winner will receive a full set of Aqua Markers (40 pens in the set). Check out their site for full details. http://polkadoodle.blogspot.com/2010/07/week-29-challenge-christmas-in-july.html

This is my entry below - only the third try to get it to work! I have deleted the other two so hopefully won't clog up their site. I must find out more about linking blog stuff! 

This was originally a card for my dad on father's day. A bit different for a man but he likes flowers and butterflies. To make the card I started off making the background using Ranger distress ink (I made two). The second one I used to stamp the flowers on (Creative Expressions plate). All the stamping was using the perfect medium ink and black embossing powder. Once the matting and layering was done I overstamped the background with flourishes and added the cut out flowers. A little stickles glitter glue finshed the centres. The Elusive Images butterfly was also painted using distress inks, then glued only on the body allowing for a little movement. Finally I added more flowers and a base plate, cut using a Wizard die, with Happy Fathers Day to act as a stop allowing the card to stand open. On the back I added a further plate Wizard die cut with my sentiment.   On refection I should have added a further flower in the opposite bottom corner, but too late now!


Wednesday, July 21, 2010

Peacock ladies

Peacock ladies were made using a stamp plate from Graphicus. The lady is so beautiful and with bling even better. The first two pictures are of course of the same card, but with the front flaps in different positions to show each of them.  There is no colouring on this one, just as it stamped (ok with just a little colour)

The blue and pink cards with the semi circle were inspired by a  friend asking for something in the art neuvo/deco style.

The last one used a silver shimmery paper (in reality if reminded me of non slip flooring!) The lady is decoupaged onto the front. The main element is all the bling, I really went to town with the gems - a bit overdone?

Tuesday, July 20, 2010

Weaving

I first saw this technique some years ago. It was demonstrated by Stephanie Scheetz of Kodomo. It is quite a simple technique if rather fiddly. The first card is made using one of  the Kodomo rubber stamps and is in a pale colour. The other two are family members, the first being my mum and dad's wedding anniversary and the second is my stepson and his wife.  To produce the weave you simply take two identical images, cut one image horizontally and the other vertically - both equidistance. Then start weaving one into the other. I found it easier to low tack one section down and use the other for the weaving itself. Once completed stick DST over the back to hold it all in place. Trim the edges as necessary (if you want the jagged edges as in the first/last card just trim with either patterened scissors or tear.) Once this is completed mount onto a suitable card blank decorated to suit.

Monday, July 19, 2010

Oldies

Here is a selection of 'Oldies' all from stamp sets from Creative Expressions and coloured with Cosmic Shimmer watercolours.  Most of the papers were from a stash I have had for a long time and thought it was time to use up! Some backgrounds have been stamped. Embellishments are mainly Spellbinders diecuts.
Hope you like them.

Wednesday, July 14, 2010

50 Years

I was asked to make a card for my friend's relative's 50th wedding anniversary.  I thought the Glitter Girls tall stories embossing board fitted the bill. I used shiny gold card and printed some pearlised paper with words and '50' then embossed it all. These were then used to emboss and cut out for the main body of the card. Using a very old group photo (50 years actually!) I managed to isolate and enlarge them. This was copied several times so I could decopage them. Using another of the Glitter Girls boards I made a flower with 50 in the centre. The small 'book' from the board was used to accent their names and wedding date, this was also embossed. Finishing touches were the gold bows and the line of gems.  A matching box was made to house the card.

NB Computer printing then embossing onto pearlised card works quite. Just remember to coat the paper with an anti-static bag and work quite quickly.

Tuesday, July 6, 2010

Farmyard

This is the first card I made with Sheena Douglass' create a scene stamp set 'farmyard'. It did start off as a much larger 'creation' but due to some odd painting! it became this smaller DL card. It was all painted using cosmic shimmer watercolours. The basecard is a brown slightly corrugated card with some pre-patterned leaf paper. Finally it is finished off with a Spellbinders symbology die cut and some leaf brads.

The second card is using the same stamp set but I managed to make it a larger scene by using the farmer and his dog and sheep. The wall with the owl was just stamped on. I think I will try to mount a cut out one next time.  The flowers on the left are from a Sheena Douglass stamp set which I find myself using time after time.  The owl finishes the scene off.
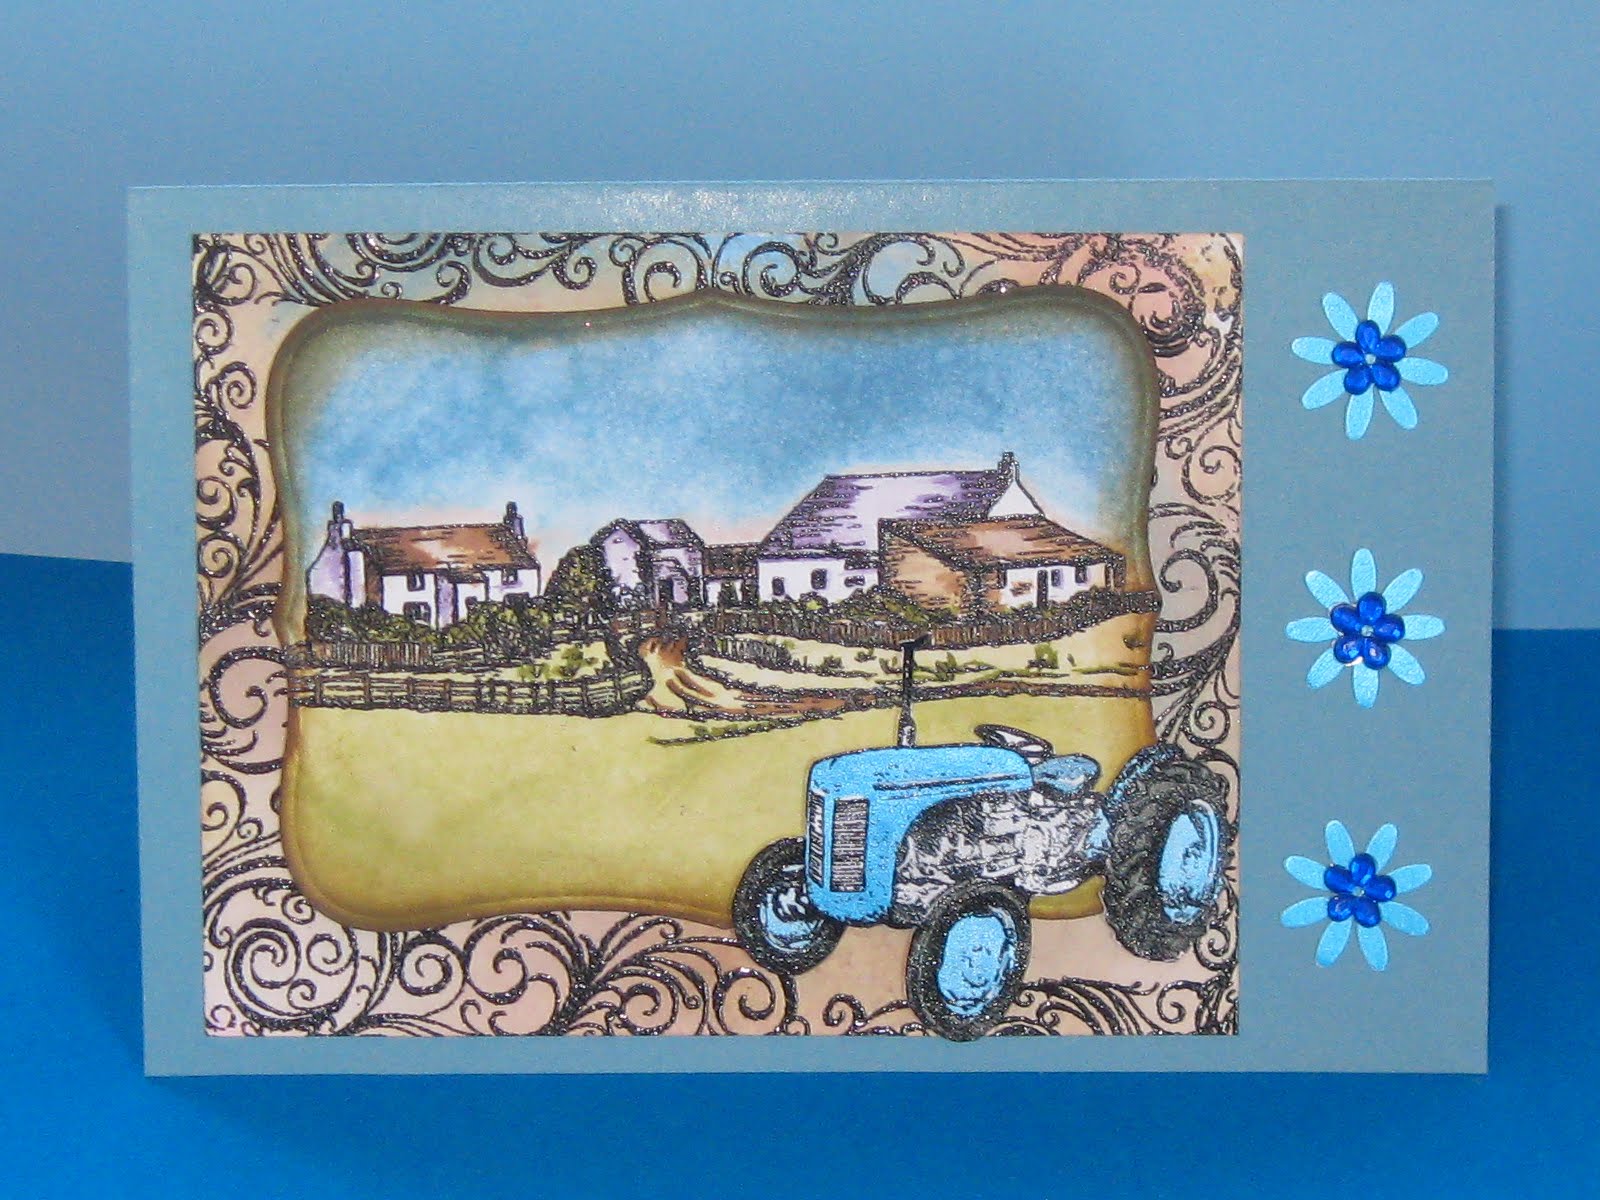
The blue card is the same scene with a frame over the top.  The tractor is stamped, coloured and mounted separately. Three punched flowers finish the right hand edge (and fill up the gap)

Saturday, July 3, 2010

Bring on the Clowns

A few clown card samples. Made using a stamp plate from Creative Expressions and coloured with Cosmic Shimmer watercolour paint. A few gems and bits and pieces and voila!

Monday, June 28, 2010

Bugs


These 'bugs' stamp sets from Creative Expressions are really quirky. I have done a few! Here is a selection.

The large card blank was covered in green spotty paper and the edges distressed. The centre mat is agai white card covered in plain green paper, again distressed.  The spiders web was stamped across the green paper and embossed in black.  The boot, ants and toadstool were water coloured and cut out and stuck on with 3D foam. The 'cute' spider was also cut out and two huge wobbly eyes added then stuck over one of the webs.

The  black card was mounted with yellow paper and the huge sunflower from the set was stamped three times directly onto the white mat and coloured. The centres have seed beeds for texture. The boot, ants and flying thing were coloured, cut out and 3D mounted to the card. The sentiment finishes it.

I didn't realise how much I had used black and yellow card for this selection but again, here it is! A white mat was stamped repeatedly with the web and embossed. The boot painted and cut out along with the ants. The big eyed spider was stamped onto a nestibilities die cut and then stamped again with only the body being cut out. It was mounted onto acetate to allow it to wobble about. 

The final card is for my grandson's birthday in July (hope he doesn't look). The easel was made, yet again with black cardstock. The tin can was painted and cut out with one of the ants being inserted through a slit in the top of the can.  The other ants were stamped across the inside of the card and painted, the centre one was stamped again with only the body added to make a 'stop' for the easel to stand on.  All the mats had the web stamped over them.


Hi Cupcake

Thought I would try using some of my paper stash for these cards. This A5 cream card has a metallic purple mat, followed by the spotty paper. The next mat is again metallic purple with the stripe, these were mounted using foam tape. The cupcakes for all the cards were stamped using Cosmic Shimmer Olympic Gold Lustre then painted using CS paints and the 'sweet elements' on top were glittered. Finished with the sentiments 'Hi Cupcake' and 'Naughty but very nice'. 

The black and yellow card is made using paper direct from Japan! Nestibilities were used for the mounts and the cupcake again painted with CS paint.

Simple matting and layering for the flowery card, but quite effective. Perhaps a little stamping around the edges might have given it a lift?

The little square card again uses more of my paper stash! But this time I also stamped a little around the edges in black to make it pop out a little. Also used the black mat for the same reason.

Not too sure about the easel card, I think perhaps deeper paint on the cupcake, it does seem a little lost on the strong orange card.

I couldn't decide if I liked the last card. I had some free papers from a magazine (can't remember which one) and quite liked it. So, I matted it onto the ornge cardbase. Did orange mats for the cupcakes and stamped a cupcake greeting for the middle. Oh, well, It's different!


Wednesday, June 23, 2010

Fans

Here are a selection of fans shaped cards. The first one is using the Glitter Girls fan embossing board for the basic shape. The peacock lady head is a stamp from Elusive Images. All cut out and simply stamped but then glitzed up with gems, gems and more gems. The second fan is made using the same stamp but done in purples - still lots of gems but also a couple of flowers this time too.   The next two are made using Joanna Sheen's Dancing with Shadows CDRom.  On the pink fan I cut the fan shapes directly around the ladies and mounted them onto the fan. The backing paper was, I think, printed from an Artilicious CDRom. Flowers are used to decorate this time. The final black/gold fan is also made using Joanna Sheen's CDRom, but this time I mounted the fan shape onto a cardblank.  I copied the ladies into 'word' and made them quite a bit smaller. I then painstakingly cut them out!  These were then stuck onto the gold background. I used one of the border shapes to emboss the top and bottom of the card and cut out black inlays topped with little punched flowers.  All these fan card had matching boxes made for them.

Just stamping

A really simple card using the Chatsworth collection of stamps from Docrafts. The background cards are cream and stamped repeatedly with the chandelier. The smaller piece is mounted onto a bronze satin cardstock. I stamped and clear embossed the standard lamp onto the same cream cardstock and mounted it up onto the bronze card. Pale green gemstones are used around the edges of each mount. It's your day sentiment finishes the card.
The second card is very similar, done mostly the same way except for the purple mirror card and gems around the edges.

Saturday, June 19, 2010

Today's offering


This one started out to be a simple make! I started off with tan cardstock with a pearlised paper on top stamped with a leaf design. So far so good!  Then using acetate I put alcohol inks over it, then spread a good layer of glossy accents over this followed by scrunched up tissue paper. After leaving it to dry overnight I stamped the 'Create a Scene - pub' directly onto the acetate. I also stamped the leaf design along the left side and top edge. This should have been the end of the card! However, I smudged the ink on the pub - totally spoiled. So, what could I do? I restamped the pub and embossed in black. I then painted it using distress inks. I also embossed  and coloured the barrels and the pub sign. I then used UTEE to completely cover the pub and the sign - very shiny.  The bottom of the card was rather bare - (oh how one thing leads to another!) so I decided to stamp the flower heads along it. Again, unfortunately, I made a mess on the card holding the acetate! So, I cut out the flower heads and stuck them individually along the bottom edge. I then cut a thin frame to fit exactly over the top of mounted acetate - thus hiding all my messy mistakes!  The bottom photo is just at another angle.

Saturday, June 12, 2010

Fathers Day

I know it's a bit girlie but my dad likes butterflies and flowers. I started off making the background using Ranger distress ink (I made two). The second one I used to stamp the flowers on (Creative Expressions plate). All the stamping was using the perfect medium ink and black embossing powder. Once the matting and layering was done I overstamped the background with flourishes and added the cut out flowers. A little stickles glitter glue finshed the centres. The Elusive Images butterfly was also painted using distress inks, then glued only on the body allowing for a little movement. Finally I added more flowers and a base plate, cut using a Wizard die, with Happy Fathers Day to act as a stop allowing the card to stand open. On the back I added a further plate Wizard die cut with my sentiment.

Friday, June 4, 2010

So different


The first card is done simply on black card using silver accent. The silver card was run through a Wizard using an Impressibilities die.  The card does look a little purple but this is due to light casting shadows. The dragon is painted using orange and purple Cosmic Shimmer paints. The accents are cut from Spellbinders dies.

This card is done on a black card. The background paper was made by running a sheet of thin card through the Wizard using a piece of netting to emboss. I then stamped a leaf border in different distress inks. After this dried I went over the whole page with distress inks and cut & dry foam. The tulips are from a stamp by Papermania. These were also coloured using distress inks. I allowed each coat of ink to dry before adding further ink to shade. After it all dried I went over the whole page with distress inks and cut & dry foam.